Tips and Resources for Being Warmer in your GHI Unit this Winter: from a January 7, 2012 workshop at the Greenbelt Community Center
The Jan. 7, 2012 workshop provided hands-on demonstrations on how GHI members can
get the most out of their electric baseboard heaters;
- insulate their attic hatches;
- prevent cold air from coming into their houses; and
- use other low-cost strategies to be warmer in winter.
Below are suggestions on how you can get the most from your baseboard heaters. Following those tips are links to a number of helpful instructional videos on low-cost to keep warm air in your house and to prevent cold air from infiltrating.
Baseboard Heater Basics
by Steve Skolnik
Baseboard heating systems are designed so that each baseboard is responsible for heating a particular room or area. Each unit is controlled by a thermostat, which can be located on the wall, or on the unit itself.
There are three basic components of a baseboard heating system: the heating element, the chassis and airflow channel, and the thermostat. The element produces heat when electricity passes through it; the element is fitted with a series of metal plates called fins, which help transfer the heat to the room air. The thermostat is an 'on/off' switch that controls the flow of electricity to the heating element, based on room temperature.
How does it work? When the thermostat senses that heat is needed in the space, electric current flows and makes the heating element very hot. By natural convection, cold air is drawn over the hot element and its fins from the bottom of the chassis, and directed into the room by a deflector built into the chassis. The heated air rises and forces the cold air to the floor, starting a pattern of air circulation (convection) in the room.
Tips for operating and maintaining a baseboard heating system:
- Turn down the thermostat in rooms that aren't being used.
- Consider installing programmable setback thermostats, which can be set to automatically reduce room temperatures at night and when you are at work.
- Set thermostats to temperatures at the low end of the comfort range. This prevents excessive energy use at night or when no one is home.
- For unit-mounted thermostats, use a room thermometer to determine the room temperature so you can make an accurate setting.
- Baseboard heaters take more time to heat a room than fan-assisted heaters, so plan ahead for maximum efficiency.
- Follow the heating unit's maintenance instructions.
- Never open the baseboard cover without turning the heater off at the circuit breaker panel and letting the heating element cool.
- Keep the area around the heating units free from obstructions to allow proper air flow. Place furniture at least six inches from baseboard heaters. Keep drapes from touching heaters. Fire danger from baseboard heaters is low, but avoid allowing any objects to come in contact with them. Keep small children away from heaters.
- Don't place combustible materials on or near heaters.
- Vacuum baseboards occasionally to remove dust and other debris. This is particularly helpful at the end of the summer, when the most dust collects. Vacuuming will reduce the "burned dust" smell you get from baseboard heaters when they're turned on for the first time in months.
- If there are multiple heaters in one room control them from one centrally located thermostat.
Baseboard heaters are an effective room-by-room heating solution. They require little space, no ductwork, and the initial cost is relatively low, making them perfect for remodeled areas as well as for new construction. Units are easily installed in almost any kind of space, plus baseboard units heat each room separately, which can result in reduced energy consumption when unused rooms are not heated. Baseboard heating is quiet, draft free, and each room can be thermostatically controlled. Temperature will be maintained to within one or two degrees of the thermostat setting.
CLEARANCES
FLOORS & CARPETING: HEATERS MAY BE MOUNTED DIRECTLY ON ANY FLOOR SURFACE, INCLUDING CARPETING. WHERE WALL-TO-WALL CARPETS ARE INSTALLED.
AFTER THE BASEBOARD INSTALLATION, THE CARPETING CAN BE RUN UP TO THE FRONT AND AROUND THE HEATER BODY.
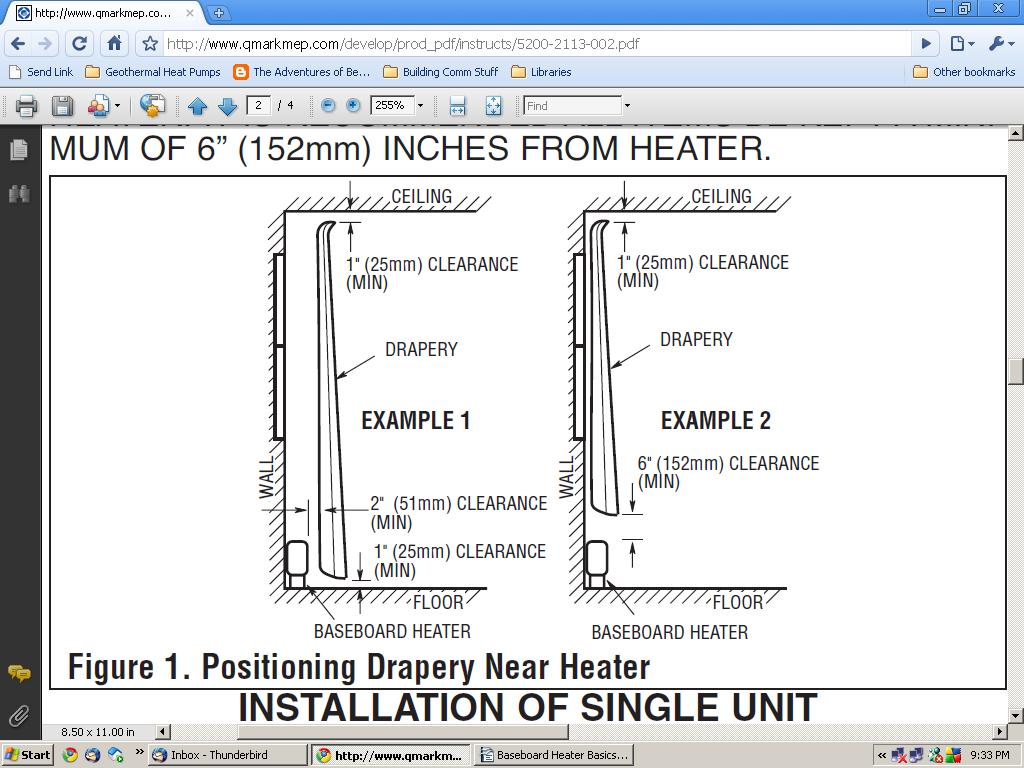
FULL LENGTH DRAPES (example 1): FOR THE MOST SATISFACTORY OPERATION OF HEATERS, THE FOLLOWING CLEARANCES MUST BE MAINTAINED:
1. HANG DRAPES SO THAT, IN USE, THEY EXTEND BELOW THE CENTER LINE OF THE HEATER, BUT WITH AT LEAST
1” (25mm) CLEARANCE FROM THE TOP OF THE FINISHED FLOOR COVERING, SUCH AS CARPET, TILE, ETC.
2. HANG DRAPES SO THERE IS AT LEAST 2” (51mm) BETWEEN THE EXTREME FRONT OF THE HEATER AND THE NEAREST FOLD OF DRAPES, IN THE FOLDED BACK
POSITION (OPEN DRAPE POSITION).
3. HANG DRAPES SO THERE IS AT LEAST 1” (25mm) BETWEEN THE TOP OF THE DRAPES AND THE CEILING.
SHORT DRAPES (example 2): HANG DRAPES SO THERE IS AT LEAST 6” (152mm) CLEARANCE ABOVE THE TOP OF THE HEATER.
FURNITURE: DO NOT PLACE FURNITURE AGAINST HEATER. IT IS RECOMMENDED ALL ITEMS BE KEPT A MINIMUM OF 6” (152mm) INCHES FROM HEATER.
OPERATING AND MAINTENANCE INSTRUCTIONS
An integral or remote wall thermostat is recommended for each room. In very large rooms it is recommended that a low voltage thermostat with double or multiple circuit relays be used to provide the most comfortable results.
DO LOCATE DO NOT
THERMOSTAT LOCATE THERMOSTAT
• A minimum of two feet • Near television or any
(61cm) from outside wall appliances that emit heat
• Approximately five feet • Where it would be struck by direct sunlight
rays of (1.5m) from the floor, preferably on an
inside wall location
To clean heater:
Because of the convection heating principle, which depends upon circulation of air through the finned element, dust particles will periodically be deposited between the fins and should be removed occasionally for maximum efficiency of the heater. A vacuum cleaner with proper attachments can easily be worked along the top and bottom of the finned element to clear it of dust deposits.
NOTE: The painted finish of the heater may be cleaned with a slightly damp cloth if desired. Do not use wax cleaners or polishes as these waxes may vaporize when the heater is in operation. DO NOT PAINT THE HEATER.
Reference: Marley Engineered Products, Electric Baseboard Heaters Installation & Maintenance Instructions, Part No. 5200-2194-007
Instructional how-to Videos
Attic Pulldown Stairs Insulation
Attic Hatch Insulation
Attic Hatch Insulation w/ Door Replacement
Detecting Air Leaks and Caulking (Overview)
Caulking (More Detailed)
Insulate Electric Outlets and Switches
Weatherize Windows with Plastic Film
Window Air Conditioner Tips
Window Air Conditioner Installation
Other Resources on the Web:
Detecting Air Leaks
DIY Home Air Pressure Test
Air Seal and Insulate
Tips for Sealing Air Leaks
Attic Access Insulation and Air Sealing
Caulking
Weatherstripping